Showing posts with label tutorials. Show all posts

Wednesday, December 12, 2012

FREE Tutorial: I'm Your Tiniest Fan


These little tiny fans make perfect earrings, however, if you don't want earrings, feel free to turn them into tiny pendants or even decorations for wine glasses! (Wouldn't that be a great hostess gift?!) It only takes a handful of materials and if you don't have the copper links, try using any good stiff metal link that you have on hand.

Oh, and share this free tutorial far and wide it's my little Christmas gift to you!
 
Here's what you'll need to make your fan:
- One 15mm link from MissFickleMedia (2 for earrings)
- 4mm Faceted Czech Glass Rounds (A)
- Size 8 Seed Beads (B) (I used two different colors)
- Size 11 Seed Beads (C)
- Size 15 Seed Beads (D)
- 10mm Daggers (E)
- Wildfire or Fireline Beading Thread
- Beading Needle Size 10 or 12
 
*Note: I have not specified colors here. I chose a deep blue/purple combo, because it's one of my favorite. This tutorial leaves a lot of room for creativity, so feel free to make your fans in whatever color combo you like.
 
Here's a snapshot of my mix:
(I also don't tend to measure, I just pour out the beads and get started!)


1. Cut a piece of thread 3' in length, tie a double knot onto the link leaving a 4" tail.


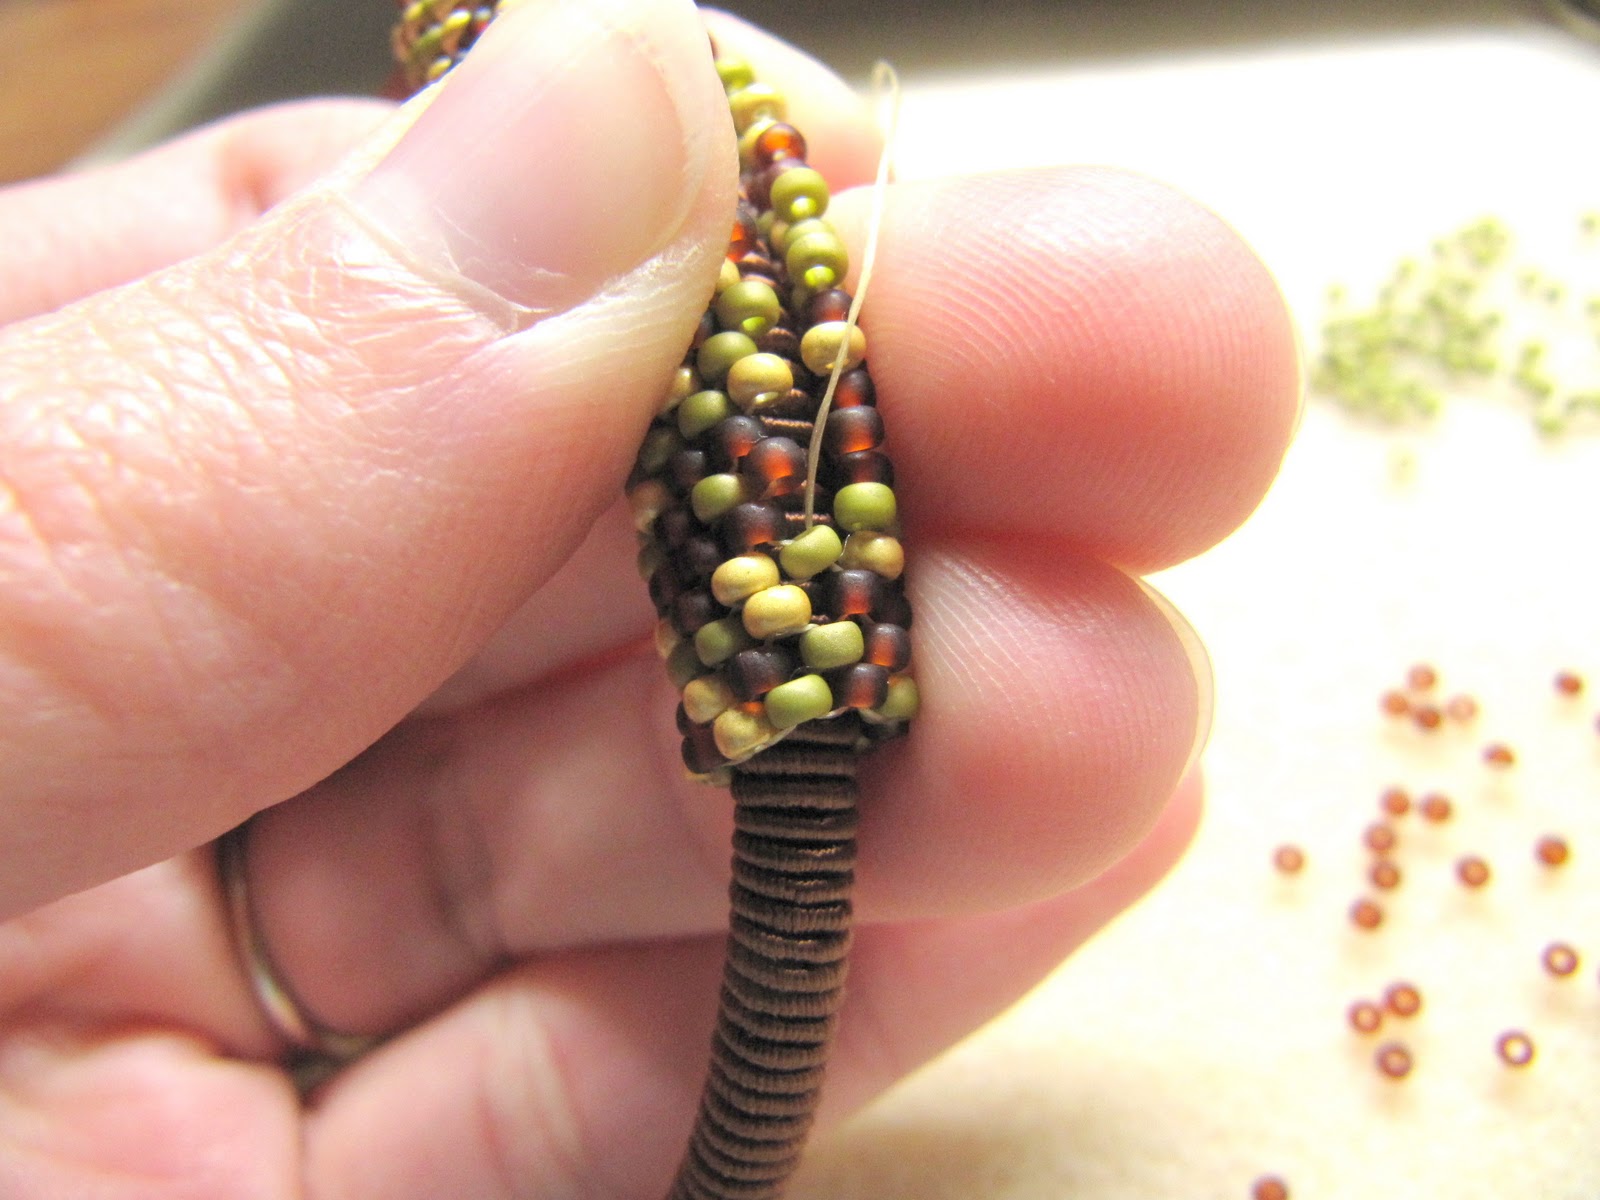
2. String 1B, 1A, 1B. Loop your thread around the link and pass back through the 2nd B that you added. (Brick stitch)


3. String 1A, 1B, loop the thread around the link and pass back through the 1B that you just added. Do this two more times until you have four size 4mm rounds around your link, and you are exiting from the last 1B that you added.


4. String 1E and pass through the first A so that the dagger sits to the side.


5. String 2C and pass through the A. Do this twice more to add 2C between each A.


6. Pass down through the 1B that you added at the beginning of Step 2. Loop your thread around the link and pass back up through that same B.


7. String 1E and pass through the A.


8. String 1C, 1B, 1C and pass through the next A. Do this two more times and exit through the Dagger. *Note: You'll need to "push" these three beads behind the 2C that you placed there in Step 5. (See how they are sitting just under the 2C that you added in the previous round?)  


9. String 1D and pass back through the dagger.
*String 4D, pass over the A and through the C, do not pass through the B, skip over it and pass through the next C. (This will cause the B to pop out a bit)
Complete this step from the * until you pass through the other dagger.
 

String 1D, and pass back through the dagger and the 4D that you just added.
 
 
10. *String 1B (I've switched colors here) and pass through the next B. String 1B and pass through the 4D.
Complete this step from the * and pass through the dagger. 
 

Pass through the 1D and back through the dagger.
 
 
11. String 1D, 1A, and 1D and pass through the B. String 1D, 1 dagger, and 1D and pass through the next B.


String 1A and pass through the B. String 1D, 1 dagger, 1D and pass through the B.
Do this two more times you've added the third dagger . String 1D, 1A, 1D and pass through the end dagger.

(Do you see how the last 1D, 1A, and 1D that you just added is kind of sliding behind the 4D? This is not a problem, you'll need it later, so don't worry about it!)


12. Flip the piece over. String 2D and pass through the last D that you added in Step 11, the 1A and 1D.


Pass through the 1B. String 1C, 1D, 1C and pass through the next B, A, B. This will cause the dagger to pop forward a bit and give it a bit more structure and that 1C, 1D, 1C that you just added will sit on top of the dagger (or behind it if you're looking at the fan from the front.)


  Continue down the line of the fan adding the 1C,1D, 1C to finish the row. When you come to the end, pass through the 1D, 1A, 1D.


13. String 2D, loop your needle around and pass through the dagger just as you did to begin Step 12. Knot your working thread and tail thread into the beadwork, trim the ends and hang your earrings or pendant any way you see fit!  


I hope you enjoy creating your little fan and thanks for being a fan of La Bella Joya!

Also as a little gift, from now until the 15th, if you purchase any piece of jewelry from my shop, I'll upgrade your shipping for free! You'll get priority shipping on me to make sure that your gifts arrive in time for the holidays. Oh, and everything in my shop is ready to ship!
Here's the link to all the goodies.

Happy Holidays!  
 

Sunday, January 29, 2012

The Woven and Wrapped Bracelet - Free Tutorial!

I've gotten such great feedback from my Looking Glass Pendant Tutorial and I've really enjoyed looking at all the great versions of that design that you all have created. It's nice to see you really running with it and making it your own.
So, to keep with the inspiration, I wanted to give you another free tutorial. This time a bracelet!
The one is easy peasy and recycled!


I created the Indigo version you see in this photo as a gift for my sister for Christmas.
It worked up so quick and looked so good that I knew I wanted to make one for myself, so this time around, I photographed the steps to share with you!
I hope you enjoy!

Skills:
To create this bangle, you will need to know how to do Peyote Stitch and you'll need to know how to zip up a Peyote tube.

Materials:
- A hank of Color Infusions Memory Thread in color of your choice (I bought mine back when everyone was buying this stuff, I'm so glad to finally get to use it!)
- A metal bangle (This one is one of those cheapos that I've had forever so don't feel like you have to go out and buy one, hence the upcycling! Make sure the width is around 5mm so that you can cover it completely with one hank of the thread)
- 3 different colors of size 11 Japanese seed beads.
- Nymo Thread (or Fireline)
- E6000 craft glue (or similar strong craft glue).
- Size 12 beading needle
- Scissors


Instructions:

1. Put a pea size amount of glue on the inside of the bangle. Wrap the thread around the dab of glue a couple of times. (Tip: keep the thread on the shuttle and pass the entire shuttle through the bangle as you work to avoid knots.)


2. Make sure your wraps are tight and close together. You will have glue seeping out between the cracks, don't worry about it, just wipe away the excess with your fingers (yes, this is a messy job).


3. Keep on wrappin!


4. Yep....still wrapping...


5. Whew...getting closer....


6. Light at the end of the tunnel!


7. When you have about 1/4" remaining, add another drop of glue. (Again, messy but don't worry, we will hide this later!)


8. When you come to where your thread meets the thread where you started, snip the thread leaving 3 or 4mm.


9. You may need to snip a little more, but use your fingers to press the remaining thread down against the bangle until it is as flush as you can get it and then wipe away the remaining glue.


10. Set the bangle aside, the glue will dry while you work on your peyote tube. Get out your beading needle, thread and beads. I've chosen a yellow mustard color, a lime green and a matte frosted sienna.


11. String on an EVEN number of beads in a random color pattern. I did 30 beads for the Maize bracelet and 20 for the Indigo. It really depends if you want a small strip of color, or a large, but just remember that you will use this to cover your gluey thread connection, so make it large enough to hide that.


12. Work in Peyote stitch, after you've threaded your beads, thread one more and pass through the second to the last bead that you just added. String another bead, skip one and pass through the next. Continue working peyote in this manner.
If you've never done peyote, fear not....found you a great video here.


13. Keep working in peyote. If it starts to curve, don't fret, just keep working, trying to choose beads that are the same size as you work.


14. The strip will eventually pull itself straight as you work.


15. Check your piece as you work to see that it will wrap around your bangle and also that it will zip up. To determine this, count the beads along the width of your strip, they should be an even number in order for the strip to zip up.


16. Wrap the piece around the inside of the bangle and over the glue connection that you made.


17. Here's a better photo:


18. Begin zipping up your peyote tube. This means that you will not add any beads, but use those from both rows to lock them together.
Check out this really clear tutorial here for further instructions.


19. When you have finished, knot the threads together. I always go back down through the thread path that I just went through again to reinforce the join. Weave the tail thread and the working thread into the beadwork, knot two or three times and trim the threads.


Voila!
You're done!


This project is only limited by your imagination.

Try a few variations:
- Mix up the color scheme. Use a contrasting thread with contrasting beads.
- Create two or three peyote tubes and wrap them around different sides of the bangle.
- Try a bigger bangle and use more thread. You'll probably have two gluey connections, but make two peyote strips to hide them.
- Make a few bangles in coordinating color schemes and wear them all or one at a time.
-Create a peyote tube with a chevron pattern for a funky tribal flavor.

These make great gifts. They're easy to wear and easy to make and the best part is the price.
I'm sure I didn't pay more than about $5 for the materials, and the results are well worth the time and effort.
I hope you enjoy creating these bangles and if you finish one, I'd love to see your version, so send a photo my way!

Enjoy the rest of your weekend!

Monday, December 19, 2011

Submitting to Bead Magazines: The Technicalities

Earlier, I promised you some tips for submitting to beadweaving magazines. Well, I'm here to make good on that promise.
In this post I'm going to tell you everything that I consider before I submit a design to a magazine and everything that I do while working on the design to send it to a magazine. These are all the things that I'd wished someone had told me when I started submitting. It would have made the process so much easier.
Please note, this information is primarily for seed bead addicts and those who like to weave bead to bead, though I'm sure the information has applications for other crafts, so glean what you need from these tips.
I hope this information is helpful and that you'll truly be encouraged to submit your original designs in the coming year.

1. KNOW THE MAGAZINE.
I've said this before, but it's worth repeating.
You are way more likely to get your work accepted if it's along the same lines of the kind of work that the magazine already publishes.
Now, by this, I don't mean that publishers want repeats of things they've published in the past, but if you look at the types of designs that land in the project pages, they are sparkly or shiny or brightly colored, but with a clean design that doesn't have your eye jumping all over the place.
Elegant, sparkly rivolis from mountainshadowdesign

Also, think about the specific magazine that you're interested in.
Does it lean toward more elegant pieces?
Are there simple designs among the pages or are the designs more complicated and time intensive?
Is there a certain section of the magazine for designs incorporating other techniques or a section that wants quick designs with a short material list.
After you've completed your design, play matchmaker to find the perfect fit for your creation.

2. KNOW THE LINGO.
Jargon: the language, especially the vocabulary, peculiar to a particular trade, profession, or group.

Do you know what it means to "pass through" or to "pass back through"?
Can you tell the difference between an Iris finish or an AB finish? 

Can you spot a Charlotte?
Do you know how Peyote and Brick are similar? 

And why does a design become more complicated when you have to go up in size?
Miyuki Tila beads, two holes, a pain for technical editing.

These are all things you'll need to know when writing your instructions and in order to talk intelligently about your design.
At this stage, when you're trying to get published, "Stick your needle in a pile of beads" just won't cut it. So, read, read, read the instructions to previously published projects, even if you don't actually work the project, it will help you get a feel for exactly how the project instructions are written.

3. KNOW THE THEMES.
Aaah! I just found out that Beadwork Magazine no longer publishes themes for their magazine!
Bummer. I really enjoyed challenging myself to create something that fit into their color or design schemes.
Oh well, we'll make our own...k?
Most jewelry magazines are published bi-monthly, which means that they are naturally focusing on a season or theme by default.
For example, you're probably not going to see an elegant, sparkly collar in the middle of July.
Nope, sparkly collars are for Winter and July brings bright colors and funky shapes.
These Czech Rounds scream caramel popcorn and fall fairs.

When you're working on a design, think about how the shapes and weave fits into the month of the issue that you're going for. Also, think about how making the design fits into the issue. For example, in the summer, I want a quick design, because I'm probably not spending a lot of time in the house. In winter, I'm probably more willing to tackle a difficult design, which means submitting something time-intensive and labor intensive might be a better design for the fall/winter issues.

4. KNOW THE GUIDELINES
I've had beaders ask me this before: Do I have to submit illustrations for my pieces if I try to submit to a magazine?
The answer: I dunno. Does the magazine want illustrations?
It really does depend. I've written for magazines that specifically ask you not to send in illustrations, and then I've written for one that required me to send in my own.
Be sure to check, check, check the guidelines and if you're not sure, write a quick e-mail to the editor whose name is on the guidelines.

Initial idea sketching for the Arab Architecture Cuff that appeared in the June/July 2011 issue of Beadwork.

But, this is my suggestion. Take a photo of each step as you complete it. That way, if you do get accepted, you can send in the photos for clarification with your piece. It helps the technical editor to see exactly what you're explaining in your instructions.
Also, when you're writing your instructions, be as thorough as you can. I really do feel for tech editors, they have a hard job as they have to take into space considerations as they edit.
 Don't feel discouraged if they have serious questions about the way you've written a step or if they hack it to pieces. They're trying to make your project perfect for their readers.

Oh, and another quick note on guidelines. Follow them to the letter. If they want e-mail, send them
e-mail. If they want a CD, send a CD. If they want you to stand on your head while writing your instructions in pig latin, then start practicing your headstands now. They are waaay more likely to accept pieces from someone who followed the instructions completely.

5. KNOW YOUR DESIGN
By this, I mean, make 2 or 3 versions and 2 or 3 colorways. Make a version and write down each step as you go. Set it aside for a couple of days and then come back and follow your own instructions to make the 2nd version. Think as you work.
Do your instructions make sense? Are they clear for someone who's never seen your project before?
Are the materials labeled correctly?


Also, think about the colors you choose. Do you have a good contrast? Are they colors that would work well in a magazine? Do they fit the feel of the design that you're trying to convey?
My last design in Beadwork, Chelsea's Gift, was a one shot deal. I had only one version. (Mostly because my sister doesn't really need two necklaces that look exactly the same) But, it was bead embroidery, which I could do in my sleep (while on my head speaking pig latin), so when I wrote those instructions, I referenced another similar project to help me with my writing.

Oh, and on the same topic. When you write your submission e-mail. Be confident. This is your project and you created it, be proud of it.
None of this:
"I really, really hope you like it, and I hope it's good enough to make it into your magazine."

This instead:
"I am submitting my piece to be considered for the February/March issue of your magazine. It's a delicately woven necklace featuring right angle weave with peyote embellishments. The embellished edges reminded me of tiny hearts, so I created a soft pink version perfect for Valentine's Day. Thank you for the opportunity to submit to your magazine and I look forward to hearing from you."


Okay, those are the most important things for now.
They'll definitely at least get you on the right foot for getting published in 2012 (or 2013).
Now, let me say this: I am not a professional magazine writer and I've only been published in two magazines for my beadwoven pieces.
However, I did go through this process with each of my published pieces and these are the things that I worried about and wrestled with every time I wrote a project.

I hope you'll keep this information handy and that it will help you as you design and work toward publication. I'll leave you with the links to a few magazines that I know for sure will accept bead woven pieces:


If you've got any questions that I didn't address here, please feel free to drop those in the comments.
Good luck designers!