Okay, this tip came from me not wanting to toss the myriad of needles that I was bending while working on my weaving projects. Instead, I've found that they are extremely useful for bead embroidery. First of all, you'll need a bent needle. Case in point:
Wednesday, September 30, 2009
Tip Wednesday: The Bent Needle Effect
I know it's supposed to be Tip Tuesday, but Tuesdays are just way too hectic, so we're movin' it to Wednesday. Not as catchy, but I think you get the point.
Okay, this tip came from me not wanting to toss the myriad of needles that I was bending while working on my weaving projects. Instead, I've found that they are extremely useful for bead embroidery. First of all, you'll need a bent needle. Case in point:
Then you'll need your lastest embroidery project. Now, the photo below shows where the needle becomes useful: At this point, I have already tacked those three beads to the backing using the thread. I'm getting ready to finish the last step of basic backstitch by drawing the needle through the three beads again before I add another three beads. Do you see how the bent needle pops right off the backing making it super easy for me to grab the needle and pull through?
Compare it to this shot with a straight needle. Here, I would have to either bend the backing or either use my fingernails to push or pull the needle through the beads. It's not a huge deal, but it's one of those simple little things that makes bead embroidery go a lot faster for me and gives me a reason to keep using a bent needle. I will say this, for beadWEAVING projects, I prefer the straight needle, because I'm holding the project in my hands and I can manipulate the angle, but for bead EMBROIDERY, the bent needle is my preference.
I hope that you can find this a little useful, and I'd like to mention that the cab used above is a fused glass cab from Lawatha. Here are two more of her cabs that I beaded up yesterday. They're beautiful and took no time at all to make. Thanks to a little bent needle! :)
Okay, this tip came from me not wanting to toss the myriad of needles that I was bending while working on my weaving projects. Instead, I've found that they are extremely useful for bead embroidery. First of all, you'll need a bent needle. Case in point:
Sunday, September 27, 2009
Let's make a goal, shall we?
Before I start talking about my goal for today, I wanted to show my entry for the SEPABS challenge. It's based on a painting by Wassily Kandinsky. This pendant was created using two cabochons from Kristie Roeder of Artisan Clay and I've tried to directly interpret the colors and shapes of Kandinsky's painting. This one was way outside of my normal asthetic, but I enjoyed creating it.
Okay, so, my goal for today....
Friday, September 25, 2009
Some new things...
It's been a long time since I've posted pictures of completed work, so here are some of the things that I've been working on.
The first is a herringbone bracelet made with 3mm bugle beads. This is the purple version of Singin' the Blues.
The second is a RAW bracelet that I call Rose-Colored Windows. It's made with size 11 and size 15 seeds. I'm really liking this bracelet, it holds its shape beautifully and the size 15's help to keep the windows perfectly square.
The third is another pendant using the glass cabochons that I purchased from Lawatha. This one is a cute little bird, and I've beaded around it to make a cute little summer pendant.
I've also been working on making a pattern for beaded rings. I like the idea of a project that I can complete and wear in a hour, and this ring fits the bill. If you visit my Flickr account you can see it in a couple other colorways that I've been working on.
Finally, I finished a herringbone collar. I used different sized beads to create a curve and I beaded it until the curve turned into a circle. It looks beautiful...unfortunately...it doesn't fit! Well, it doesn't fit me. Turns out I have football neck and just can't wear it. It would look so cute on a little girl though so I'm gonna give my neice another year to grow up a little and then she'll get a beaded choker courtesy of Aunt Marmi. :)
The first is a herringbone bracelet made with 3mm bugle beads. This is the purple version of Singin' the Blues.
Wednesday, September 23, 2009
Tip, um...Wednesday: Inspiration or Junk?
I think sometimes we fall into a rut of believing that there are "good" designs and there are "bad" designs, and if something doesn't work out for us perfectly, we abandon it completely. I do the same thing, and (mostly because I'm lazy) I got into a habit of shoving these pieces into a little box, closing the lid, and walking away. But recently, I've started to look at these "bad" designs in a different light.

Here's a picture of my junk box. It's mostly a collection of half-beaded bracelets and pendants and lampworked beads from a friend. But, do you see that little turquoise, herringbone piece labeled "inspiration" in the bottom corner?

It just so happens that one day in a particular moment of beader's block, I took out my little box and started sifting through the contents. While I definitely didn't want to restart or complete any of the projects in the box, I liked the turquoise piece and decided to see if I could use it in another way. The result? Singin' the Blues. A herringbone bracelet made with 3mm bugle beads and alternating matte/shiny seed beads. This bracelet I like a lot, the junk bracelet? Not so much. But I do realize that I wouldn't have one without the other. So, my tip for you? Keep the junk. Who knows? It may one day become the inspiration for your greatest piece!
Tuesday, September 22, 2009
Tip Tuesday
I just wanted y'all to know that if I post a Tip Tuesday it's gonna be this afternoon. I'm soooo busy today and I woke up late!!! Gotta go, but have a great day and try to go outside. It's becoming fall and it's beautiful!
Monday, September 21, 2009
En Espanol...
Hoy, quiero escribir en espanol. Mi di cuenta de que hay muchas artistas que leen mi blog que son de otras partes del mundo y que llegaron aqui porque yo deje en sus blogs mensajes en espanol. Entonces, hoy esta entrada es para Uds.!
Primero, queria mostrarles el broche para el pelo que yo hice este fin de semana. Las tres piedras son de jasper y trate de capturar los colores de ellas con las lineas de abalorios. Todavia estoy pensando en un nombre para esta creacion. Me voy pronto a preguntarle a mi mama. Ella es una fuente de inspiracion con un vocabulario mas grande que yo!
Bueno, espero que Uds. difrutaran de su fin de semana. Yo lo pase de maravilla. Estaba con mis hermanas el sabado en el centro y por la noche fuimos a bailar! (Si quieres saber mi cancion preferida en este momento, aqui esta). Pase el dia ayer con mi familia y yo, mi hermana, y mi novio trabajamos una hora para completar el crucigrama del New York Times!
Bueno, ya empezo la semana y me voy. Espero que tengan todos una buena semana y un buen lunes.
Wednesday, September 16, 2009
She get it from her mama...
Okay, today's post is going to be nothing but bragging...You all have been so supportive and complimentary of my work and It's so exciting and encouraging to read all the comments about my jewelry and designs, etc. So, I thought that I would show you where the design sense comes from. This is a mosaic table that my mom finished recently. She took an unfinished wood table and created a mosaic of flowers using plates. Yep, that's right, not tiles mind you, but plates that she bought for nothing from a home store.
I love the look of the table, and it looks so good sitting on our front porch between the rockers. It's just enough table to set a book or a drink, or in the case of today, a hot cup of tea. I also find it quite humorous (and strangely creepy!) that she also included in the table a plate chip with a face on it. We asked her about it and she said why not?
My mother's house is full of handmade things. This isn't her first piece of mosaic and I'm sure it won't be her last. She's an excellent painter and sewer, she's love to create flower arrangements, both dried and real. She's a fantastic gardener and has turned her backyard into the garden of her dreams. As I look around I see curtains, flower arrangements, paintings, ceramics, all made with a loving touch and an eye for design. So, when you leave such kind comments about my color choice or pattern use or how I incorporate this clasp with that bracelet, all I can say is....she get it from her mama. Thanks, mama!
Tuesday, September 15, 2009
Tip Tuesday: Thread Counts
Today, I decided to talk about how thread choice affects the final look of a finished piece. Whenever I start to think about the thread that I'm using for my piece, I immediately think about the outside threads along the edge that will show. However, I've learned that I also need to take into account how the thread itself will affect the color of the beads.
This first example is a peyote strip (a small one) with transparent gray beads at the top, and matte aqua beads at the bottom. You can see that by using white threads, the gray beads have an almost shiny, very bright appearance, and the aqua beads are lighter, you can also see how noticeable the threads are on the outside. Compare it to the next sample.


This first example is a peyote strip (a small one) with transparent gray beads at the top, and matte aqua beads at the bottom. You can see that by using white threads, the gray beads have an almost shiny, very bright appearance, and the aqua beads are lighter, you can also see how noticeable the threads are on the outside. Compare it to the next sample.
This is the same exact sample, but stitched with black thread. Do you see the difference in the colors? Just by changing the thread, I've made the gray beads a lot darker, and even the aqua takes on a more somber color. The upside to using the black beads in this piece is that the edge threads tend to fall away to the background and they don't pop out at you as much.
A good rule of thumb is to remember that bright threads will jump out at you and away from your beadwork while dark threads like black will recede into the background. However, be sure that you take into account how or if it will affect your beads. If these beads were opaque, the thread wouldn't affect the color at all, and I would only have to think about how they would look on the edges of my beadwork. Finally, here's a picture of the two side by side, so that you can see the difference. (Sorry, about it being sideways! Blogger has a mind of it's own!) Good luck with your next project, and remember...thread counts!
Monday, September 14, 2009
Squared Away
This weekend, my mom and I visited the Downtown Art Walk here in Wilmington, NC. It was a beautiful day and there were so many vendors. I ended up buying some wonderful ceramic buttons and pendants from The Muddy Muse. It's a husband and wife team that create some great ceramic art, check out their shop here. I ended up walking away with 10 items total, buttons and pendants, and when I got home, I set right to work. This is the first item and it features one of their ceramic buttons:
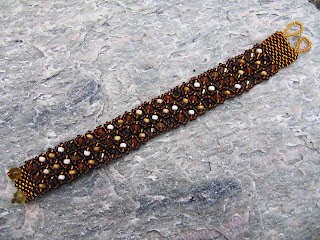
I call it Squared Away. The geometric pattern and colors match the pattern and colors from the button. It's stitched using herringbone and Czech beads. I'm gonna wait to show you the other items I bought until I have them in their rightful "homes" on a piece of jewelry.

Enjoy your Monday and have a great start to your week!
Tuesday, September 8, 2009
Tip Tuesday - Bead Refuse Bowl
In an effort to make this blog something more than just a scrapbook of my work, I've decided to include some things that I think will be helpful for my readers. So, we'll start here with "Tip Tuesday". I always enjoy reading the hints and tips in jewelry magazines, and I thought...wouldn't it be great if I could put together some hints and tips for my readers, maybe even interview some other artists to find out what little things they do to make creating easier or more enjoyable.
So, today, I'll start it off with a little something that I call "The Bead Refuse Bowl". Okay, so I totally borrowed this one from Ms. Ray, but it has really come in handy. I keep a bowl (standard cereal bowl) right beside my workspace and when I clip a thread, trim a ribbon, empty a bead tube, or break a bead...into the Refuse Bowl it goes! It has worked wonders to keep my space a little neater and it makes cleaning up a snap. Here's a picture of what mine looks like at the moment:

So, today, I'll start it off with a little something that I call "The Bead Refuse Bowl". Okay, so I totally borrowed this one from Ms. Ray, but it has really come in handy. I keep a bowl (standard cereal bowl) right beside my workspace and when I clip a thread, trim a ribbon, empty a bead tube, or break a bead...into the Refuse Bowl it goes! It has worked wonders to keep my space a little neater and it makes cleaning up a snap. Here's a picture of what mine looks like at the moment:
When I get the dough, I'm gonna spring for a cute little handmade Refuse Bowl from Etsy, until then, my Wal-Mart cereal will have to do! How about you? How do you get rid of bead refuse?
Monday, September 7, 2009
Two heads are better than one...
I think that in general seed beaders have a hard time figuring out what to do with art beads, and rightly so. It's difficult because most seed bead projects are all about the tiny little glass beads and it's so easy to use them for everything. Don't have a cute little clasp? Make one! Need a pendant for that beaded rope? Create one!...So, when I get the chance to stretch my creativity and work with beautiful handmade beads and components I jump at the chance.
Which is exactly what happened when I pulled these connectors from Kristie Roeder of Artisan Clay out of the stash.

Which is exactly what happened when I pulled these connectors from Kristie Roeder of Artisan Clay out of the stash.
I was drawn to the little glazed lines that she had created in the clay and I wanted the bracelet to reflect those lines. The bracelet is kind of in the "negative" from the connectors because the color of the lines is the buttercream and not the translucent blue. For the clasp, I joined the connectors to each other and then to the bracelet. Two beaded toggles finish off the bracelet. I wore it yesterday for a couple of hours and it wears really well.
Hope you had a good Labor Day!
Sunday, September 6, 2009
And the winner is....
Donna of This Year's Dozen! Congratulations Donna and thanks for playing along. I went down the list and assigned a number to each person (two numbers to Pam who blogged about my giveaway, thank you!) and plugged them in to the official Random Number Generator and Donna's number was the first to pop up.
If you haven't stumbled onto Donna's blog, you should definitely check it out. She does incredible things with Macrame and she has quite a few tutorials if you're interested in learning. Donna, e-mail your address to me, abney_m(at)yahoo.com, and I'll get your pendant in the mail ASAP.
If you haven't stumbled onto Donna's blog, you should definitely check it out. She does incredible things with Macrame and she has quite a few tutorials if you're interested in learning. Donna, e-mail your address to me, abney_m(at)yahoo.com, and I'll get your pendant in the mail ASAP.I'd also like to thank everyone who entered and those who spread the word about the giveaway, and to all my readers...Thank you so much for your support! I have the confidence to enter contests because of you and how much you enjoy my designs.
Gracias!!
Thursday, September 3, 2009
Right-Angle-What?? (...and the Giveaway!)
I told you a while back that I was starting to experiment a little with techniques that I'd never used before. Well, here's my second attempt at RAW. This one is very autumn-esque and just a little shimmery and shiny. (More so that I'm used to.) I tend to be a frosted/matte glass beads kinda girl, so even owning shiny beads presents a problem for me. I like the outcome though, and I was pleasantly surprised to find out how well one can transition from RAW to peyote. I used peyote to create the ends of the bracelet. I felt like it needed a little more strength at the clasp. I thought about throwing this into the giveaway, but it's a tad smaller than standard bracelet size, and I think "snug" on me would be "unwearable" to anyone else!
Oh, and speaking of giveaways!! Don't forget about mine! Spread the word people! You've only got until Friday night to enter and then it's over! It's Thursday, so that means cardio rehab (for my mom) and our weekly trip to Panera Bread! I think that's the only reason she goes to rehab. (I know it's the only reason I go!)
Have a good one!
Subscribe to:
Posts (Atom)